Charter Member Professional Outdoor Media Association
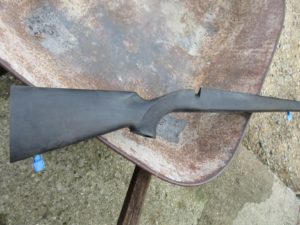
When it comes to gun stocks, nothing’s more attractive than black walnut. Some enthusiasts call it furniture and fine firearms are still being manufactured with the old time look and feel of the select hardwood that’s more stable than lesser quality wood. However, to keep costs down, synthetic stocks are in common use today, but they’re just as ugly as they’ve always been.
As I pondered what to do with just such a crude example of modern technology, I kicked around the idea of upgrading with either walnut or a wood laminated stock made by a CNC machine. The walnut option was too expensive and I’ve never got excited about the appearance of wood laminated furniture. Then I discovered hydro dipping.
Also known as hydrograpics, water transfer, cubic printing, aqua printing, etc., it can be as unique as one’s fingerprints without the excessive cost of replacement upgrades. What I’ve discovered is that the process is as easy as it appears to be on the various YouTube videos.
Printed, ready-made designs are available, but require some added techniques to properly apply them. Instead, a few spray cans of paint can be used to create a one-of-a-kind masterpiece that’ll dazzle onlookers with a unique look.
To start, remove the stock and anything attached to it.
Browning A-Bolt Stock Before Hydro Dip
Masking tape is used to keep paint off anything that may negatively alter the fit or function of the firearm. It’s good the wear some disposable gloves, too. This is a process that should be done outdoors for safety reasons!
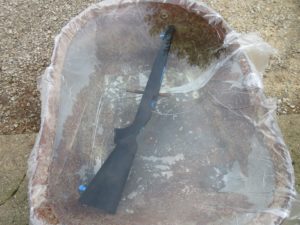
You’ll also need some type of tub large enough to completely submerge the stock. I used a wheel barrow and lined it with painter’s plastic.
Stock Immersed in Water
The stock should be thoroughly cleaned and degreased with alcohol or paint thinner or mineral spirits, which is the thinner for clean-up, as well.
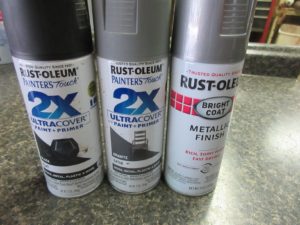
Select desired colors and purchase Rust-Oleum Painter’s Touch 2X paint and primer in spray cans. It’s good quality paint that can be applied to wood, metal, plastic and more for about $4 per can.
Rust-Oleum Spray Paint
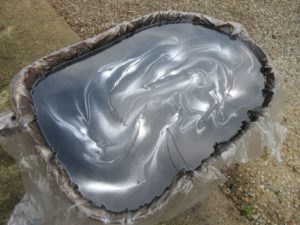
First, I sprayed a coat of flat black onto the water’s surface that was to be a base coat to completely cover the original finish of the stock. Then, I sprayed some gray and metallic chrome-like silver colored paint in small spots onto the existing black paint. With a stick, the paint was swirled lightly together. How patterns are sprayed and stirred is part of the uniqueness of the operation.
Paint on Water and Lightly Stirred
Before beginning the spray painting, I attached a wire through openings in the stock, so that it could be immersed below the surface of the water and pulled upward through the creative artwork. (Stocks can also be pushed through the top side, as well, and then pulled back through the surface. But, surface paint should be moved aside before pulling the stock upward to avoid catching unwanted paint.)
In advance, prepare a place to hang the work to dry. Then, simply pull the stock through the paint and hang it up. Even though the process may seem counter-intuitive with water and mineral-based paint, don’t worry; chemistry takes over.
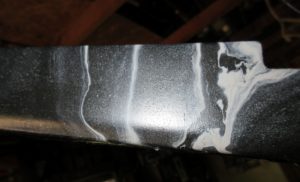
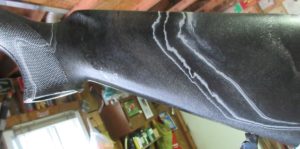
Hydro Dipped without Clear Coat
To finish the project and to protect the art, a clear coat of Rust-Oleum matte finish is required. Although the sprayed colors will dry to touch in 20 minutes and will be ready to handle in one hour, it is not fully dry for 24 hours. The clear coat should be applied after 48 hours to be on the safe side relative to any reaction with water still present. On plastic (or, on a synthetic stock) maximum paint adhesion and durability is reached in 5-7 days, so don’t rush things.
Hydro Dipped without Clear Coat
Don’t be surprised if you start looking for other items to customize.